
If your website uses analytics, marketing tools, or third-party scripts, you may need a cookie consent banner to comply with privacy regulations like GDPR.
Cookiebot is a popular consent management platform that can automatically detect cookies and display a cookie banner to visitors.
In this guide, you’ll learn how to install Cookiebot on WordPress step by step using the official plugin.
To install Cookiebot and display a cookie consent banner on WordPress:
• Create a Cookiebot account
• Add your website domain
• Install the Cookiebot WordPress plugin
• Connect your Domain Group ID
• Run a website scan to detect cookies
Why Use Cookiebot on WordPress?
Cookiebot is one of the most popular cookie consent management platforms for WordPress websites.
It automatically scans your website for cookies, blocks tracking scripts before consent, and displays a GDPR-compliant cookie banner.
Using the official WordPress plugin makes installation simple and allows you to manage cookie consent without adding code manually.
Step 1 — Create a Cookiebot Account
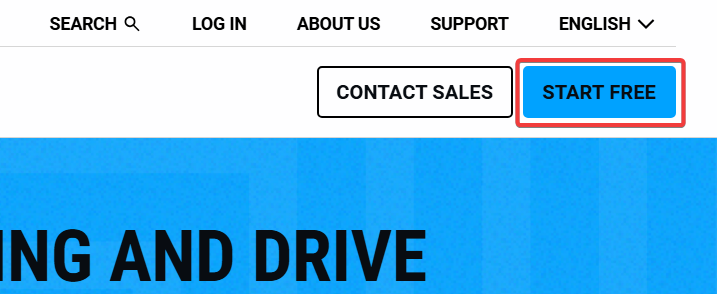
Go to the Cookiebot website and click “Start Free” to create a free Cookiebot account.
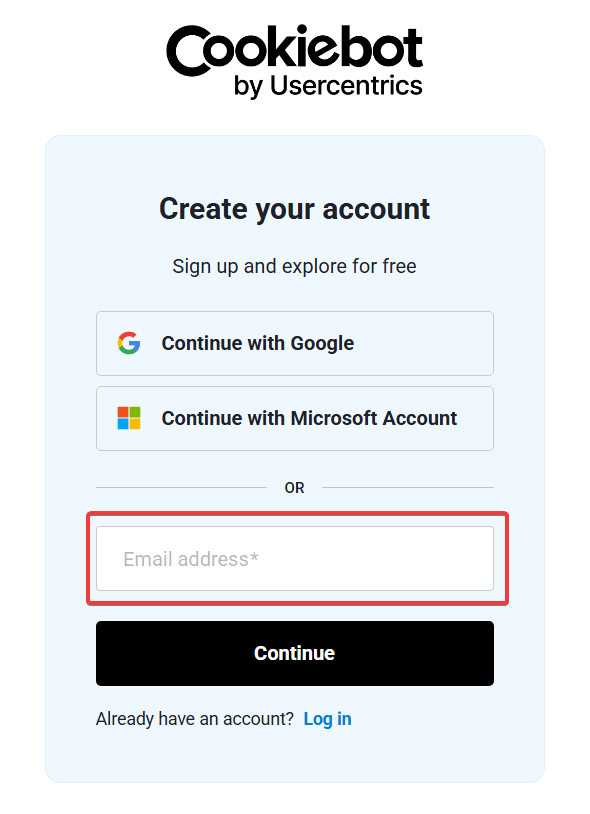
You can sign up using:
• Google account
• Microsoft account
• email address
After entering your email, follow the onboarding steps and complete your profile.
You will then be taken to the Cookiebot dashboard.
Step 2 — Add Your Website Domain
Once your account is created, Cookiebot will ask you to add your website domain.
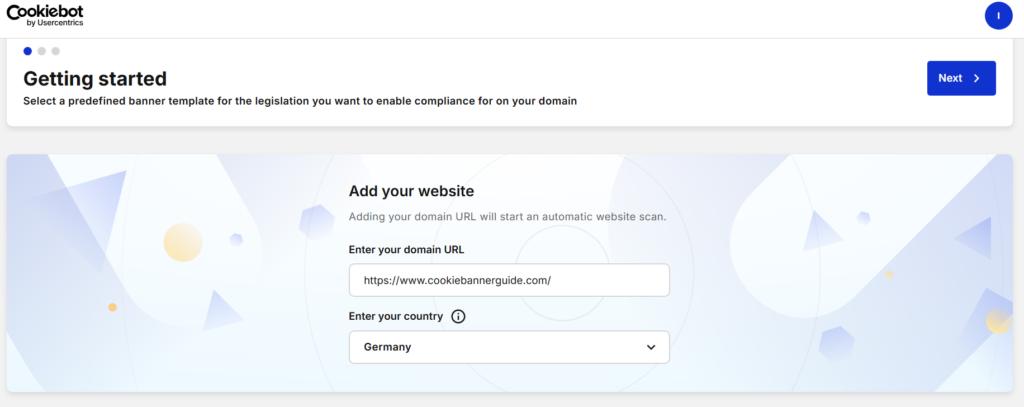
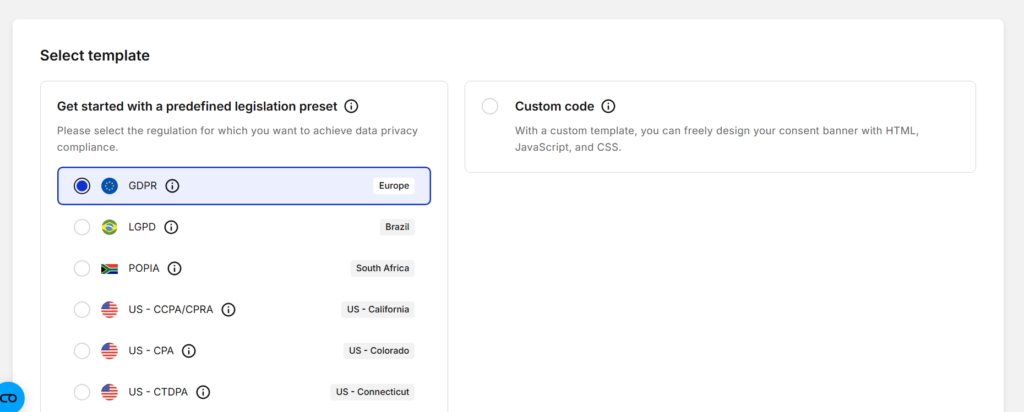
Enter your website URL and select the country or legislation you want to comply with.
Most websites targeting European visitors should choose GDPR.
After that, Cookiebot will create a Domain Group for your website.
Step 3 — Install the Cookiebot WordPress Plugin
Next, install the Cookiebot plugin in WordPress.
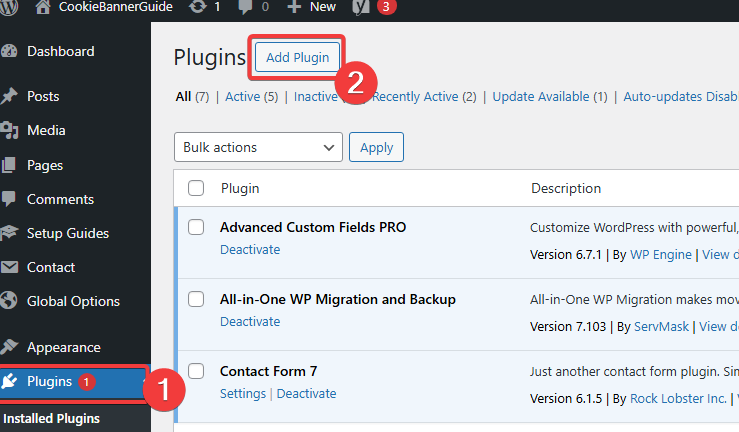
In your WordPress dashboard:
-
Go to Plugins → Add New
-
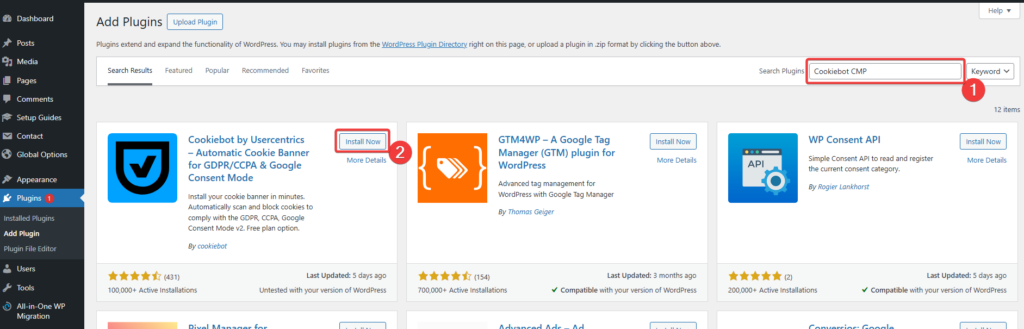
Search for Cookiebot CMP
-
Click “Install Now”
-
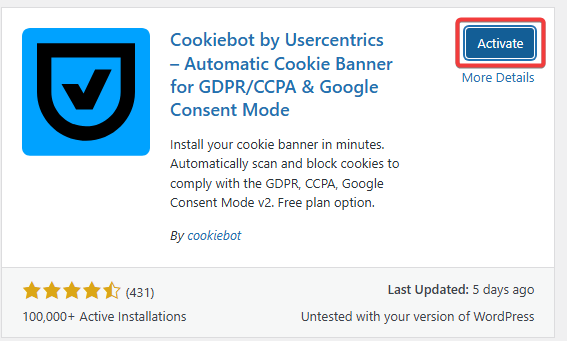
Click “Activate “
Once activated, the plugin will appear in the WordPress menu.
Step 4 — Connect Your Cookiebot Account
Now you need to connect your WordPress website with your Cookiebot account.
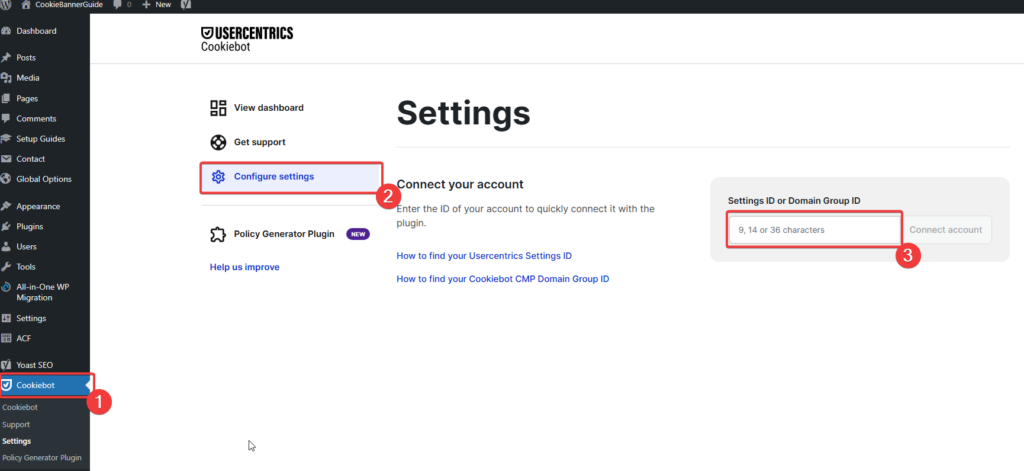
To do this:
-
Go to Cookiebot → Settings in your WordPress dashboard
-
Open Configure Settings
-
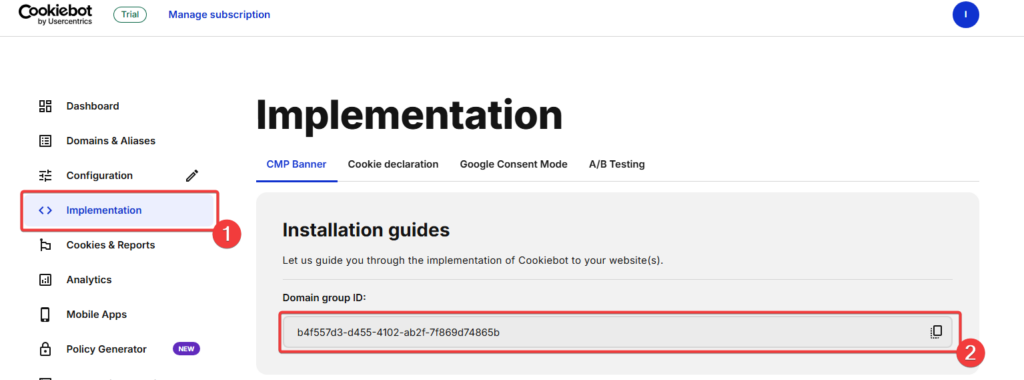
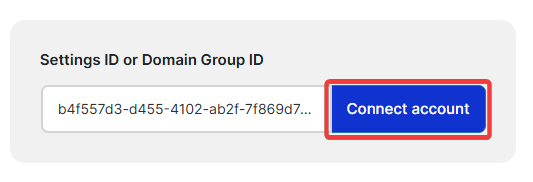
Paste your Domain Group ID
-
Click “Connect account”
You can find the Domain Group ID inside the Cookiebot dashboard under Implementation.
Step 5 — Run a Website Scan
Cookiebot automatically scans your website to detect cookies and tracking scripts.
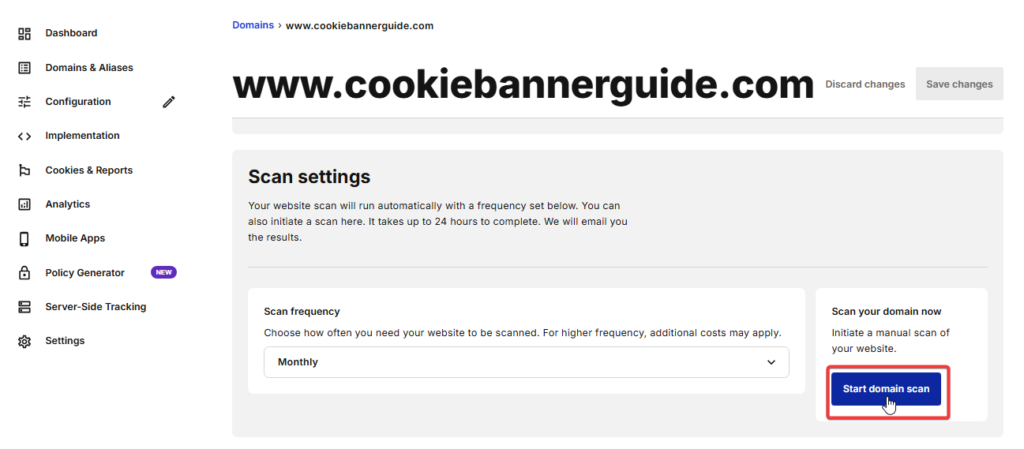
To start a scan:
-
Open the Domains & Aliases section
-
Select your domain
-
Click “Start domain scan”
The scan may take some time to complete. After it finishes, Cookiebot will detect cookies used on your website.
The Scan Is Not Perfect. Automatic cookie scanners cannot detect every cookie perfectly, so manual review is always recommended.
That’s why you should always:
✔ Check if any cookies are marked as Uncategorized
✔ Verify that analytics cookies are not placed under “Necessary”
✔ Confirm marketing scripts are properly labeled
GDPR requires accurate classification. If categories are wrong, your consent setup may not be compliant.
Review and Adjust Detected Cookies
After the scan finishes, review the cookies detected on your website.
Cookiebot automatically categorizes cookies into groups such as:
• Necessary
• Preferences
• Statistics
• Marketing
These categories help determine which cookies can load before consent and which require user permission.
Make sure the cookies are categorized correctly, especially if you use analytics or advertising tools such as Google Analytics or marketing pixels.
Correct cookie categorization is important for GDPR compliance and accurate cookie consent management.
Step 6 — Customize Your Cookie Banner
You can customize how the cookie banner looks and behaves.
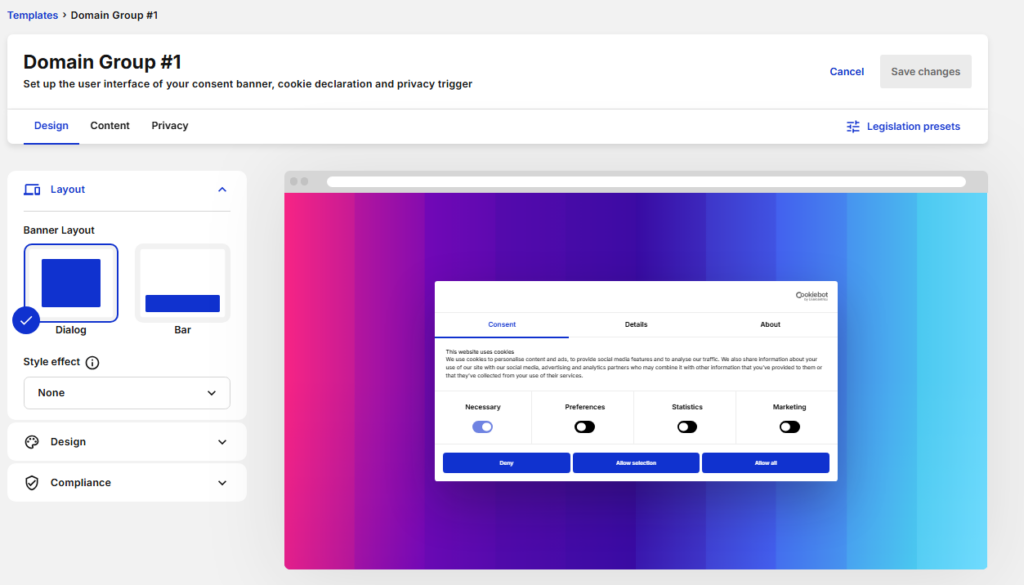
Cookiebot allows you to customize how your cookie consent banner appears on your website. You can adjust the layout, colors, cookie categories, and consent buttons to match your website design.
This helps ensure your cookie banner is both compliant and user-friendly.
Inside the Cookiebot dashboard, you can customize:
• Banner layout
• Colors and design
• Cookie categories
• Consent buttons
• Privacy text
You can also enable advanced features such as:
• Google Consent Mode
• Google Tag Manager integration
• additional privacy and compliance settings
We cover these options in detail in our guide: 👉 How to Configure Cookiebot Cookie Banner
Step 7 — Make Sure Your Banner Works
Before finishing the setup, test your cookie banner.
Open your website in incognito mode and check that:
• the cookie banner appears
• cookies are blocked before consent
• the accept and reject buttons work correctly
Testing ensures your website is properly handling cookie consent.

Summary
Installing Cookiebot on WordPress is a straightforward process.
To recap:
-
Create a Cookiebot account
-
Add your website domain
-
Install the Cookiebot WordPress plugin
-
Connect your Domain Group ID
-
Scan your website for cookies
-
Customize your cookie banner
Once configured, Cookiebot will automatically manage cookie consent and help your website comply with privacy regulations.
What to Do Next
Now that Cookiebot is installed on your WordPress website, the next step is to configure your cookie banner and make sure everything works correctly.
You can customize the banner design, configure cookie categories, and enable integrations like Google Consent Mode or Google Tag Manager.

Frequently Asked Questions
Common questions about this topic
Yes. Cookiebot provides an official WordPress plugin that allows you to easily add a cookie consent banner to your website. The plugin automatically loads the Cookiebot script and helps manage cookie consent without requiring manual code changes.
No. You do not need coding knowledge to install Cookiebot. The official WordPress plugin allows you to connect your website using your Domain Group ID, and most settings can be configured directly in the Cookiebot dashboard.
Yes. Cookiebot automatically scans your website and detects cookies used by analytics tools, advertising scripts, and other third-party services. After the scan, cookies are categorized into groups such as Necessary, Preferences, Statistics, and Marketing.
A Cookiebot scan can take anywhere from a few minutes to several hours depending on the size of your website. In some cases, the scan may take up to 24 hours to complete.
If your Cookiebot banner is not appearing, check the following: • the plugin is activated • the Domain Group ID is entered correctly • the website scan has completed • caching plugins are not blocking the script Testing the website in an incognito browser window can also help identify issues.