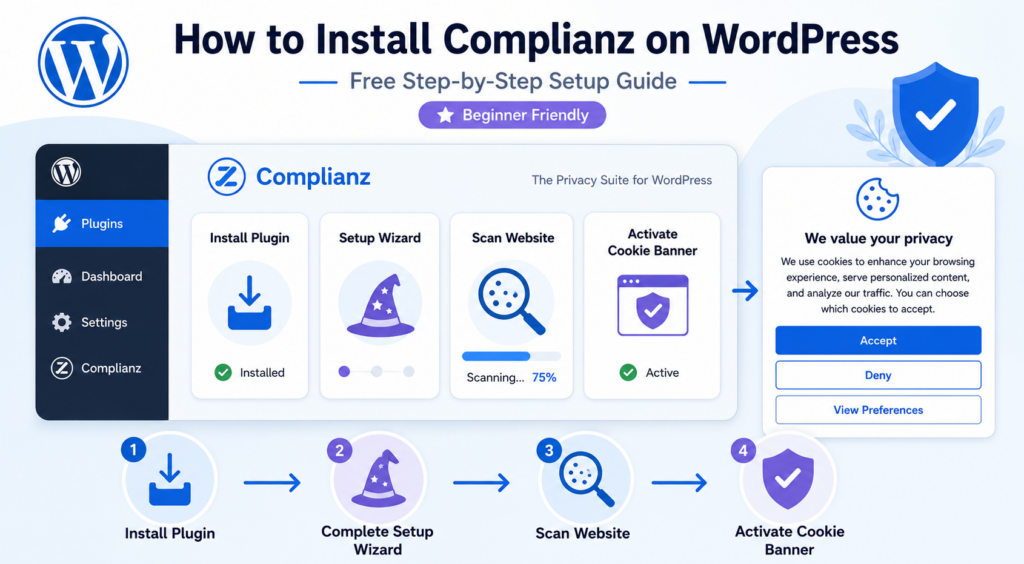
Complianz is one of the most popular WordPress plugins for managing cookie banners. It can display a GDPR-compliant banner, scan your website for cookies, generate a Cookie Policy, and help manage visitor consent.
In this step-by-step guide, you’ll learn how to install the free version of Complianz, complete the setup wizard, configure the essential settings, and activate your cookie banner.
By the end of this guide, your website will have a working Complianz installation that is ready for testing and further customization.
To install Complianz on WordPress, add the free Complianz plugin, activate it, and complete the setup wizard. Complianz will scan your website, help you create a Cookie Policy, configure your cookie banner, and block selected cookies and scripts before consent.
What You Need Before Starting
Before installing Complianz, make sure you have:
- A working WordPress website
- Administrator access to your WordPress dashboard
- Your business or website owner information
- A contact email address for privacy-related questions
- A basic understanding of which analytics and external services your website uses
You should also know whether your website uses Google Analytics, Google Tag Manager, YouTube, Google Fonts, advertising scripts, or other third-party services.
This guide uses the free version of Complianz and focuses on visitors from the European Union. If you’re new to website privacy, our beginner’s guide to GDPR cookie consent explains why visitors must give consent before non-essential cookies are stored.
Step-by-Step: How to Install Complianz on WordPress
Step 1 – Open the WordPress Plugin Installer
Log in to your WordPress dashboard. In the left-hand menu, go to Plugins → Add Plugin.
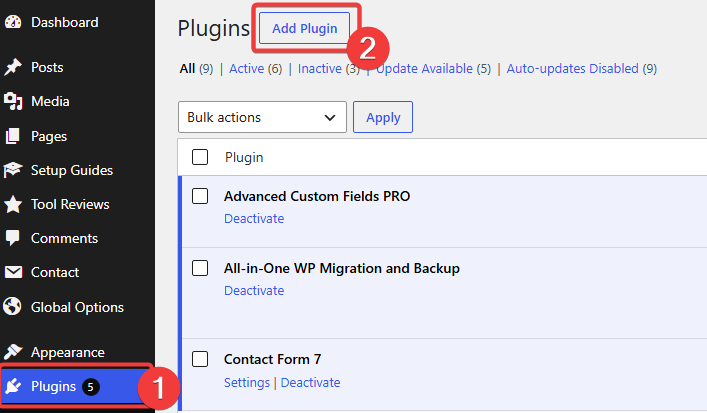
This opens the WordPress plugin directory, where you can search for free plugins.
Step 2 – Find and Install the Complianz Plugin
Enter Complianz in the search field. Look for the plugin named Complianz– GDPR/CCPA Cookie Consent.
Make sure the plugin is published by Complianz. Click Install Now.
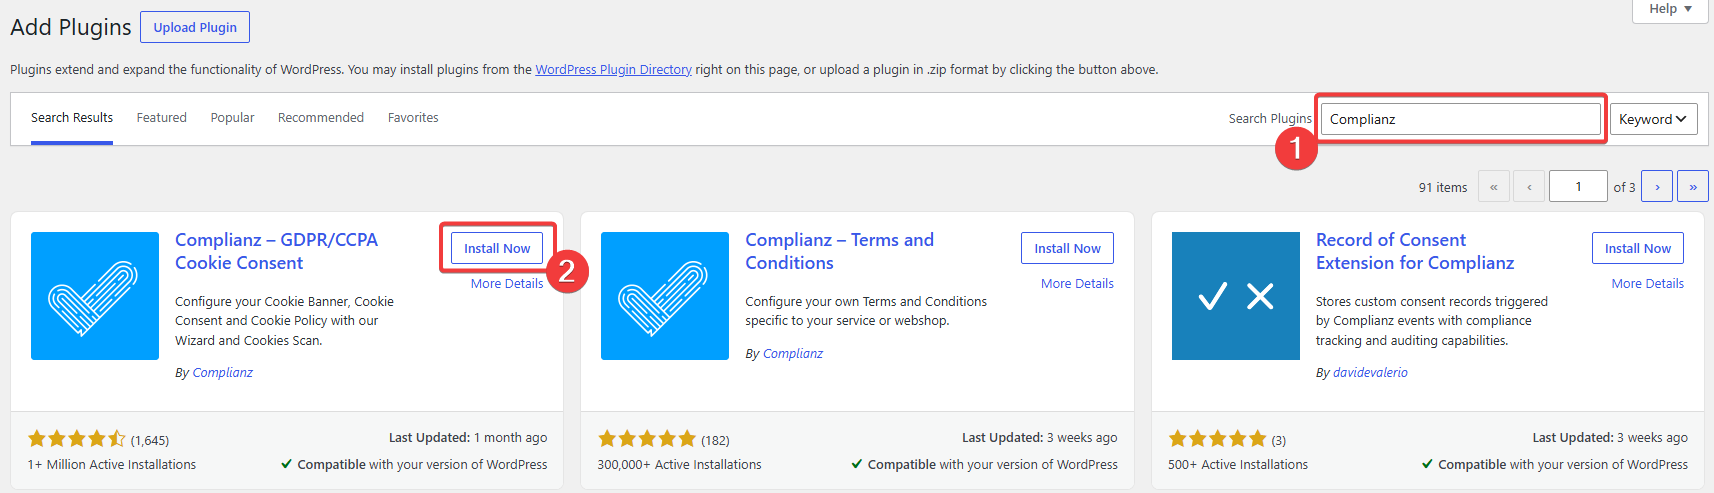
WordPress will download and install the plugin automatically.
Step 3 – Activate Complianz
After installation, the button changes from Install Now to Activate. Click it to enable Complianz on your website.
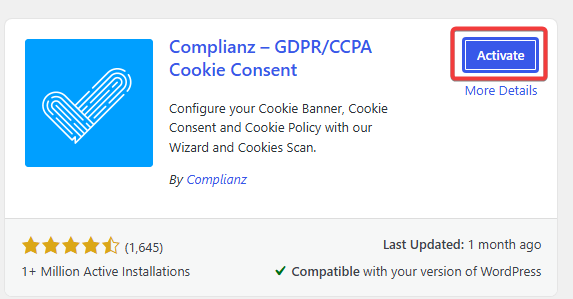
Complianz will add a new section to the WordPress dashboard menu.
Step 4 – Start the Complianz Setup Wizard
Go to Complianz → Dashboard. The dashboard shows the setup progress and any remaining configuration tasks.
Click Continue Wizard to begin.
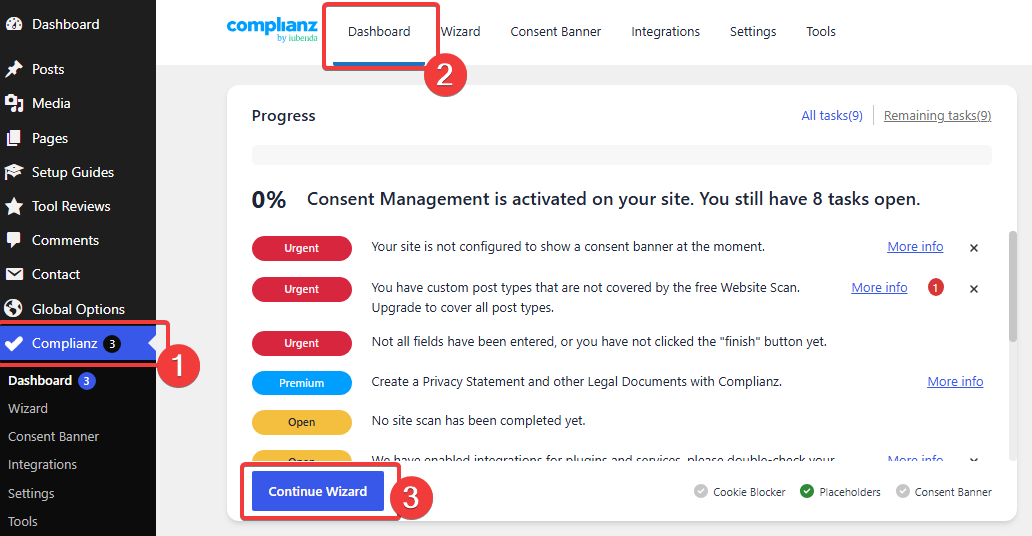
Complete the full wizard before checking the banner on your live website. Complianz may not display the banner until the main configuration has been finished.
Step 5 – Choose Your Privacy Region
Complianz first asks which privacy law or guideline should be used for your worldwide visitors.
For a website that mainly targets visitors in Estonia or elsewhere in the European Union, select European Union (GDPR).
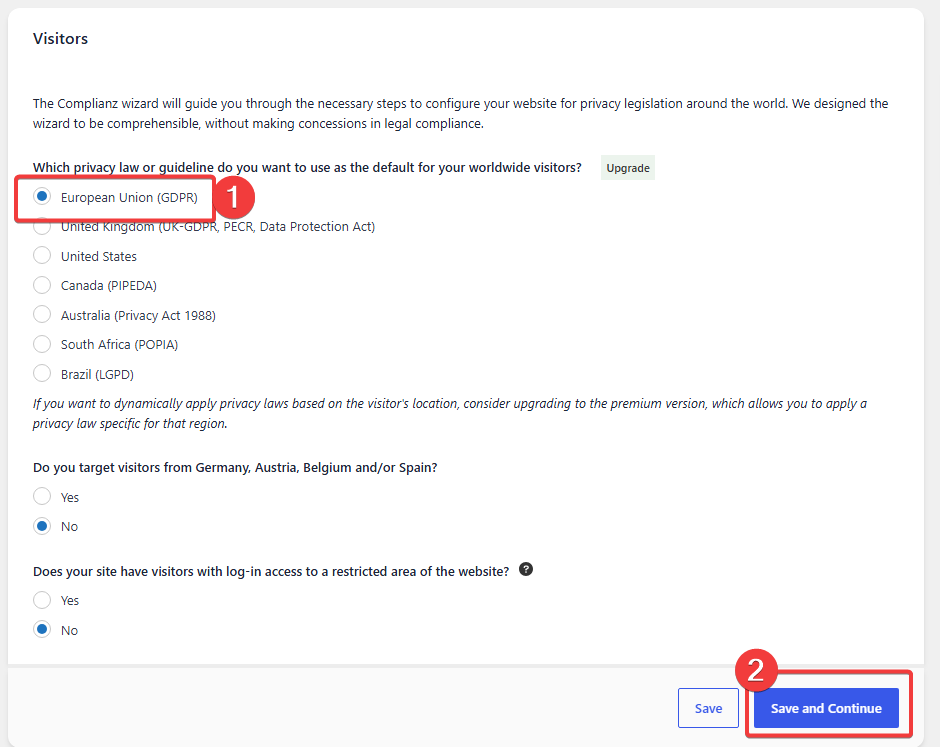
Answer the additional questions based on your own website:
- Select whether you specifically target Germany, Austria, Belgium, or Spain.
- Select whether visitors can log in to a restricted area of the website.
Click Save and Continue.
Choose answers that match your actual website. Do not copy every selection from this example without checking whether it applies to your visitors and website features.
Step 6 – Choose Your Legal Documents
Next, choose how Complianz should handle your Cookie Policy and other legal documents.
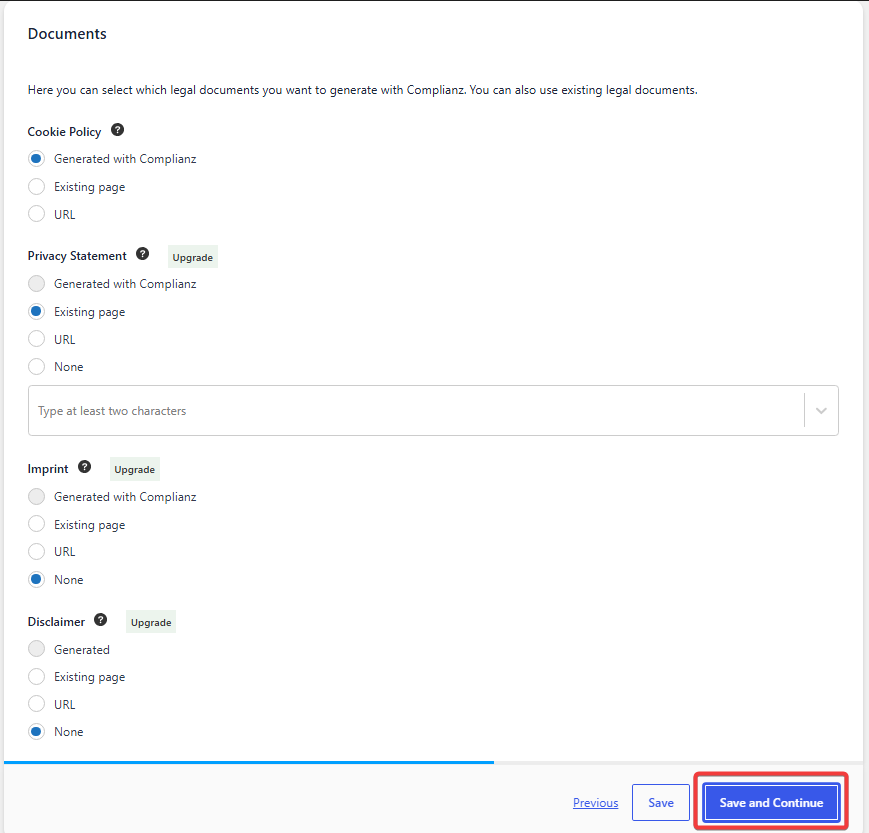
In the free version, Complianz can generate a Cookie Policy. Select Generated with Complianz if you do not already have one.
For your Privacy Statement, select the option that matches your website:
- Existing page if you already have a Privacy Policy page
- URL if the statement is hosted elsewhere
- None if you are not connecting one during this setup
Some additional legal documents are Premium features. You do not need to upgrade to complete the basic cookie banner setup.
Click Save and Continue.
Step 7 – Enter Your Website Information
Complianz uses your website information when generating the Cookie Policy and configuring the consent banner.
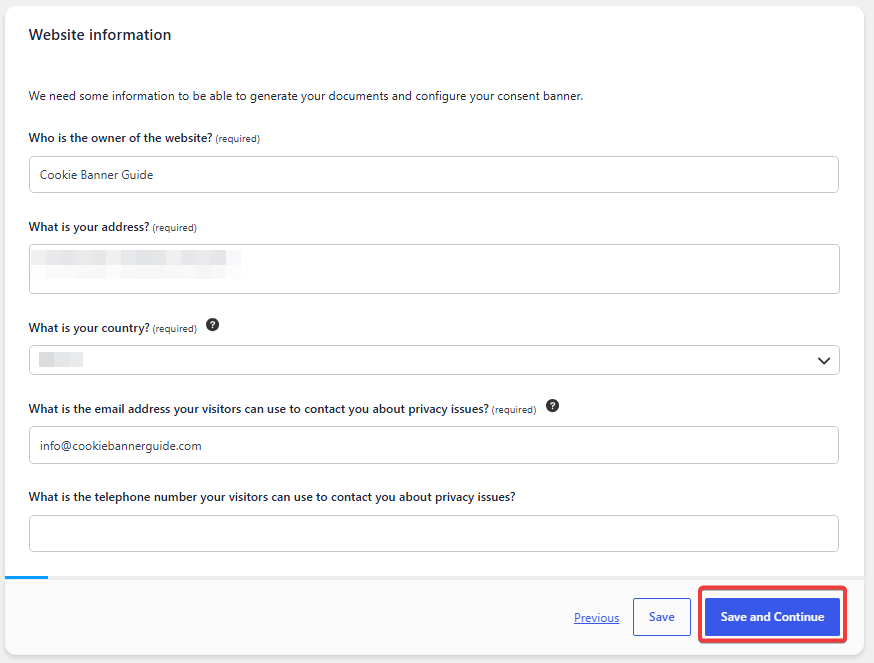
Enter the following information:
- The name of the website owner or business
- The business or website owner’s address
- The country where the owner is located
- An email address for privacy-related questions
- A telephone number, if you want to provide one
Check that the details are accurate before clicking Save and Continue.
Step 8 – Configure Security and Consent Options
The Security & Consent screen includes additional privacy features.
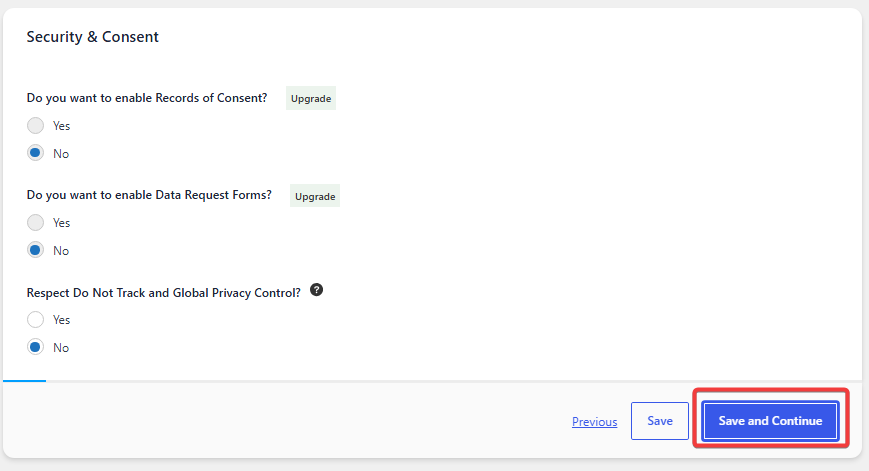
In the free version, Records of Consent and Data Request Forms may require an upgrade. You can leave these set to No for this basic setup.
You can also choose whether to respect browser signals such as Do Not Track and Global Privacy Control. Consider how these settings fit your privacy approach before continuing.
Click Save and Continue.
Step 9 – Authenticate and Scan Your Website
Complianz scans your website to identify first-party cookies and known third-party services. Learn more about how cookie scanners work if you’re unfamiliar with this process.
On the Website Scan screen, standard posts and pages should be selected. The free scan may not cover custom post types.
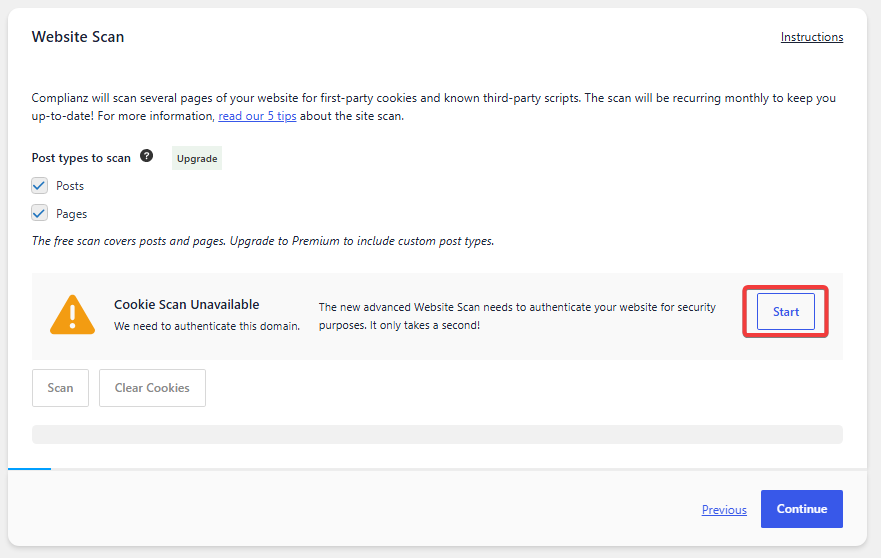
If the scan requires authentication, click Start. Complianz will ask you to enter an email address.
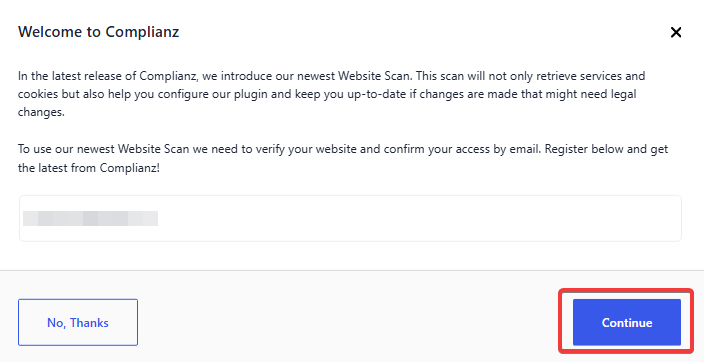
Click Continue. Then open the email sent by Complianz and click Confirm my email.
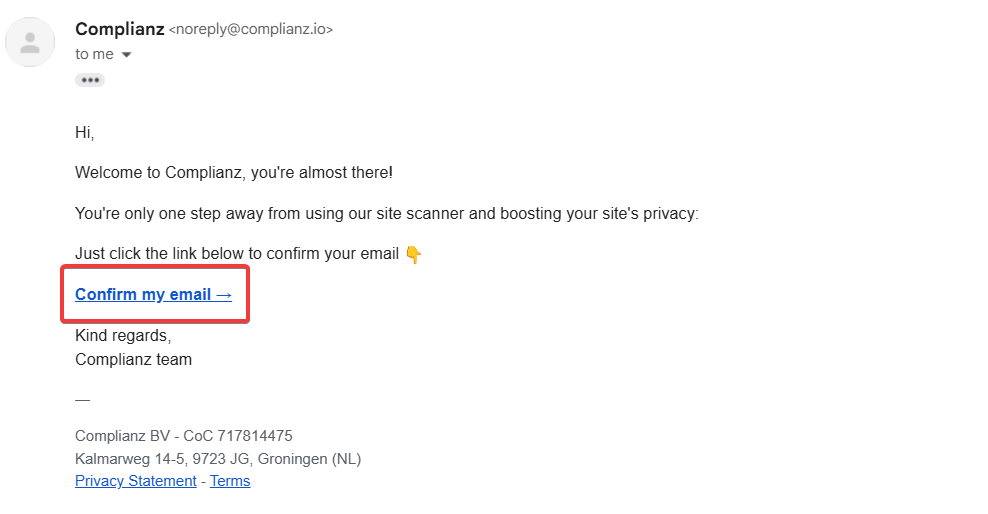
Return to WordPress after confirming the email. Continue the wizard once the scan is available.
If your website uses custom post types such as directories, courses, products, or custom setup guides, the free scan may not inspect all of them. This does not prevent the basic banner from working, but those areas may require manual testing or Complianz Premium.
Step 10 – Tell Complianz How You Use Statistics
The Statistics section asks whether your website uses analytics and how the analytics script is added. If you don’t know what GTM is, read our guide to Google Tag Manager before choosing this option.
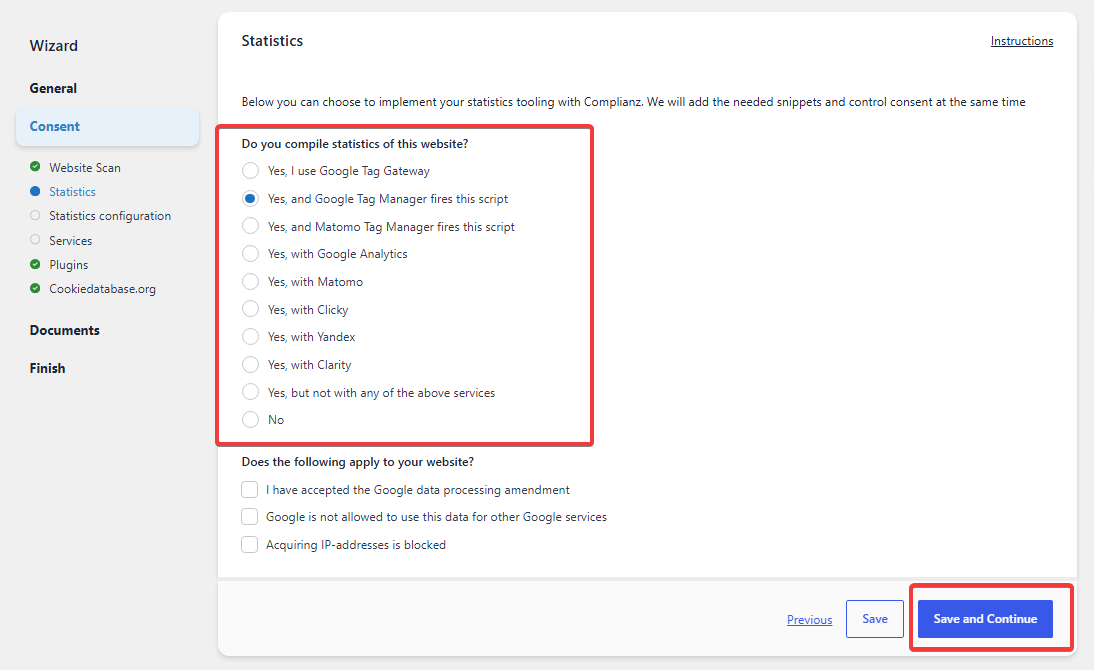
Select the option that matches your website. Common choices include:
- Yes, and Google Tag Manager fires this script if analytics is loaded through Google Tag Manager
- Yes, with Google Analytics if Google Analytics is added directly
- Yes, with Matomo if you use Matomo
- No if the website does not use analytics
Do not select Google Tag Manager unless your website actually uses it.
Step 11 – Avoid Adding Google Tag Manager Twice
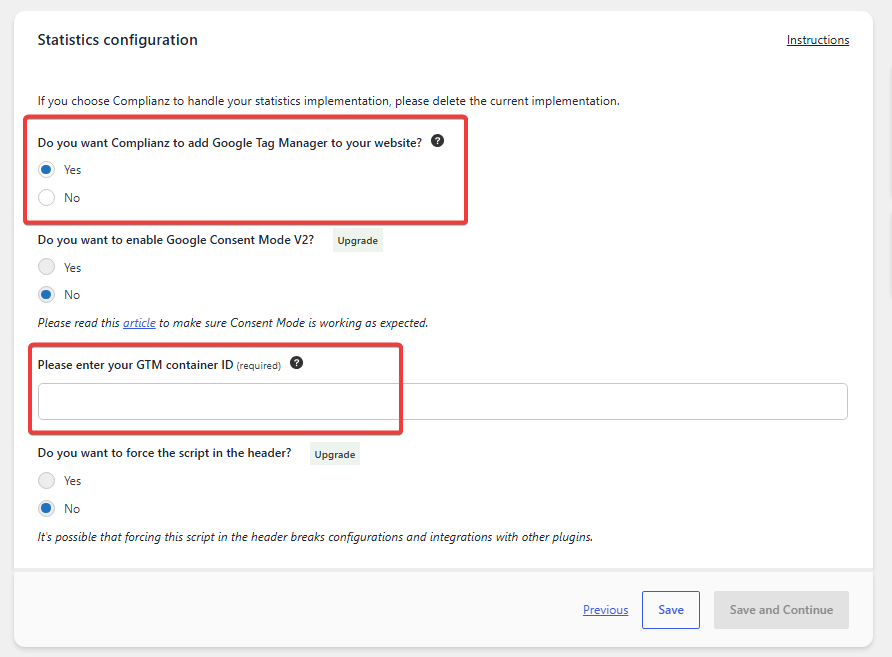
If you selected Google Tag Manager, Complianz may ask whether it should add the GTM container to your website.
If GTM is not currently installed elsewhere and you want Complianz to add it, select Yes and enter your GTM container ID.
If GTM is already installed through your theme, Google Site Kit, another plugin, or custom code, select No.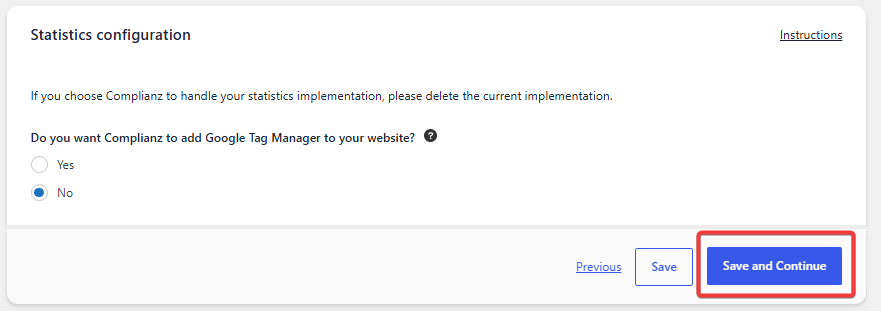
Do not let two different plugins or code snippets add the same Google Tag Manager container. A duplicate installation can cause tags and analytics events to fire more than once.
Google Consent Mode v2 is shown as a Premium option in this free setup. Leave it disabled unless you are using a supported Premium configuration.
Step 12 – Select the Third-Party Services Used by Your Website
Complianz now asks about external services that may load cookies, scripts, fonts, videos, maps, advertising, or social media content.
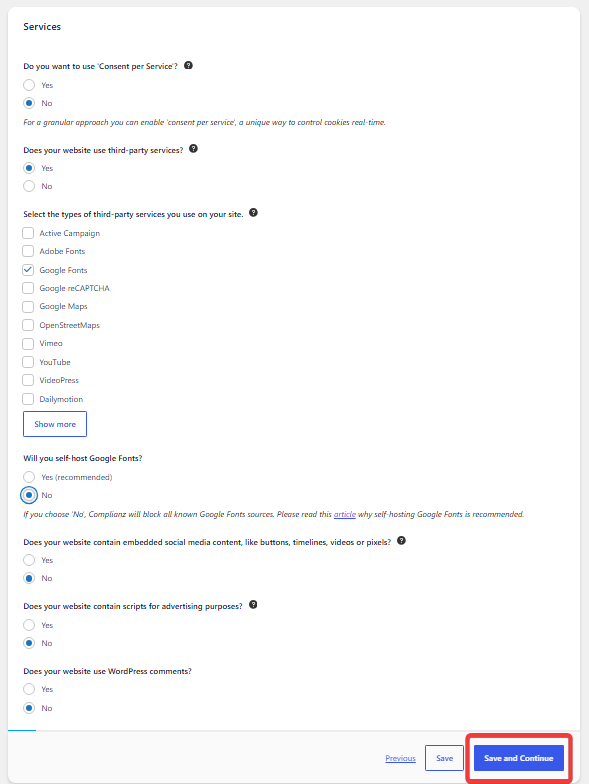
Select only the services your website actually uses. These may include:
- Google Fonts
- Google reCAPTCHA
- Google Maps
- YouTube or Vimeo
- Advertising scripts
- Social media buttons or embedded content
- WordPress comments
If Google Fonts are loaded from Google’s servers, Complianz can identify and manage them. Self-hosting the fonts locally may provide better privacy and performance.
Click Save and Continue.
Step 13 – Review Detected Plugin Integrations
Complianz automatically checks active WordPress plugins and known services.
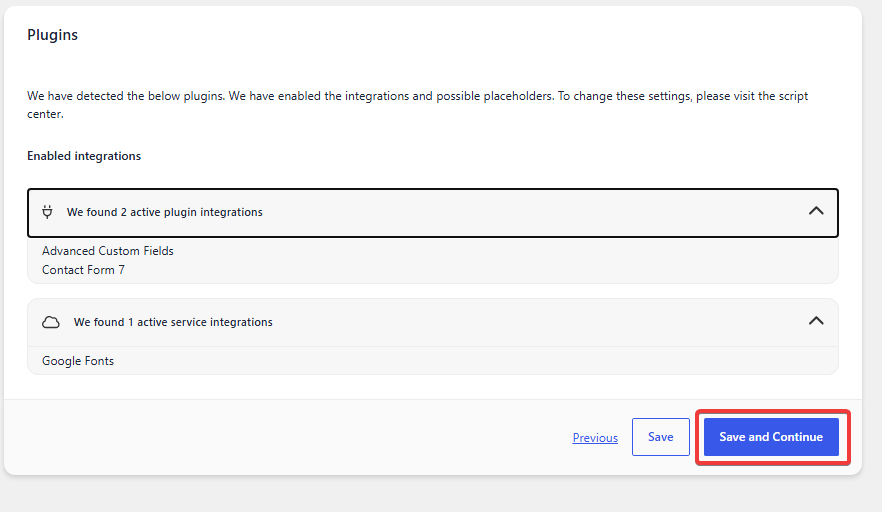
Review the detected integrations. In this example, Complianz found active plugin integrations and Google Fonts.
The results will be different on your website. Click Save and Continue when the detected integrations look correct.
Step 14 – Synchronize Cookie Information
Complianz connects cookie information with CookieDatabase.org. This helps it add descriptions of identified cookies and services to the generated Cookie Policy.
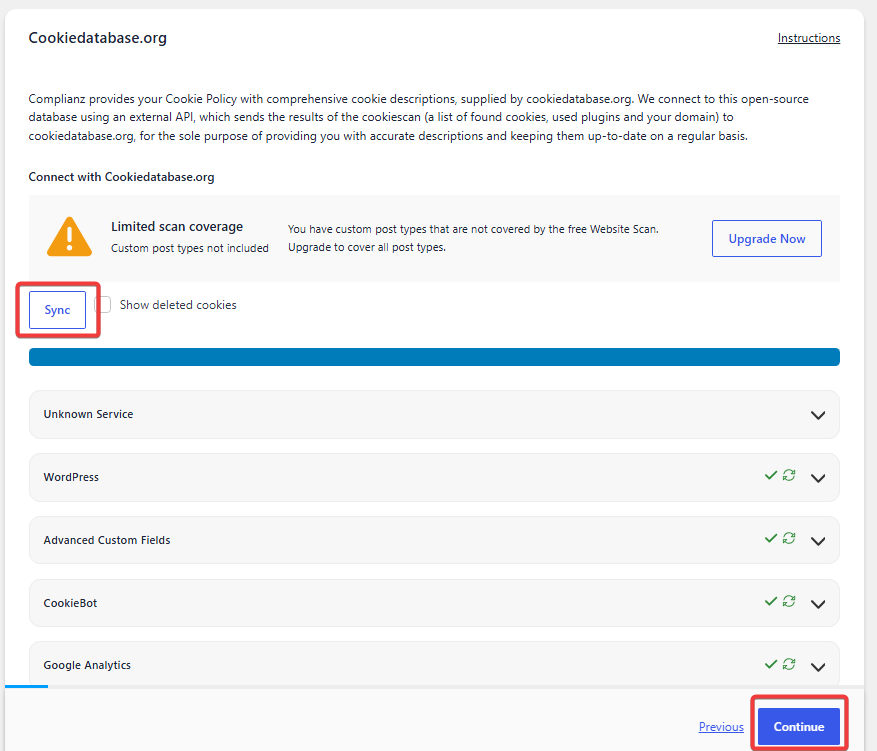
Click Sync and review the detected services. Unknown services may require further investigation.
When the synchronization is complete, click Continue.
Step 15 – Create the Cookie Policy Page
Complianz creates the necessary Cookie Policy page based on the information collected during the wizard.
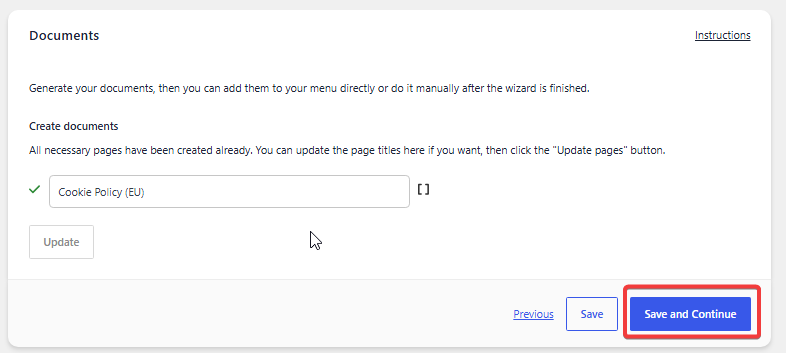
You can change the page title if needed. Click Update if you make changes, then click Save and Continue.
Remember that the generated policy depends on the answers and services you selected. Review the page before relying on it as your final published Cookie Policy.
Step 16 – Add the Cookie Policy to Your Menu
Complianz can add the Cookie Policy page to one of your WordPress menus.
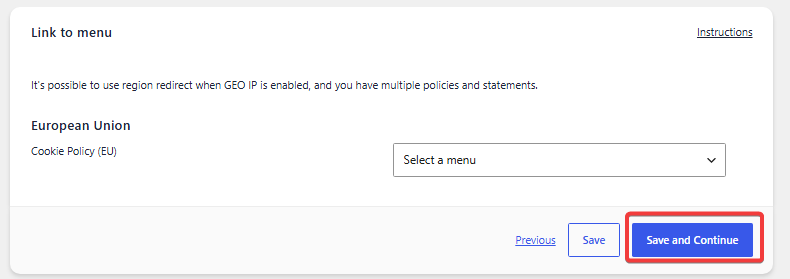
Select a suitable menu from the dropdown, such as your footer menu. You can also leave the field empty and add the page manually later through Appearance → Menus or your theme’s navigation settings.
Click Save and Continue.
Step 17 – Activate the Cookie Banner and Script Blocker
On the final wizard screen, enable the cookie banner and cookie/script blocker.
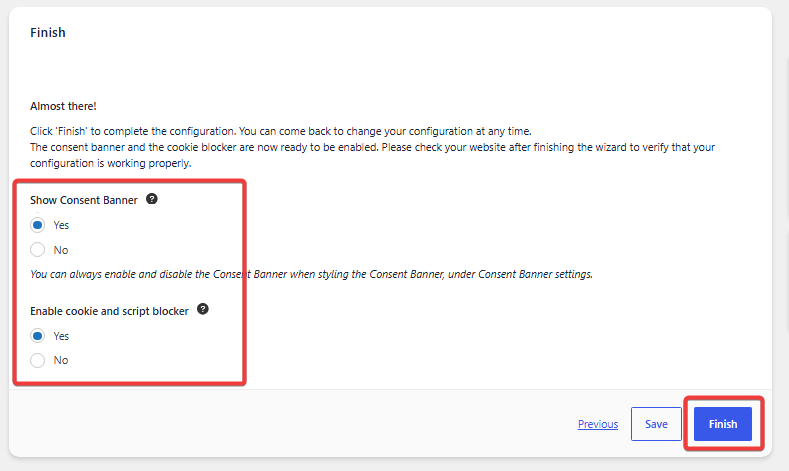
For a standard GDPR setup, select:
- Show Consent Banner → Yes
- Enable cookie and script blocker → Yes
Click Finish to complete the wizard.
Clear your WordPress cache after finishing the wizard. Caching or optimization plugins can sometimes continue serving an older version of the page without the latest banner settings.
Step 18 – Review the Cookie Banner Settings
Go to Complianz → Consent Banner to review and customize the banner.
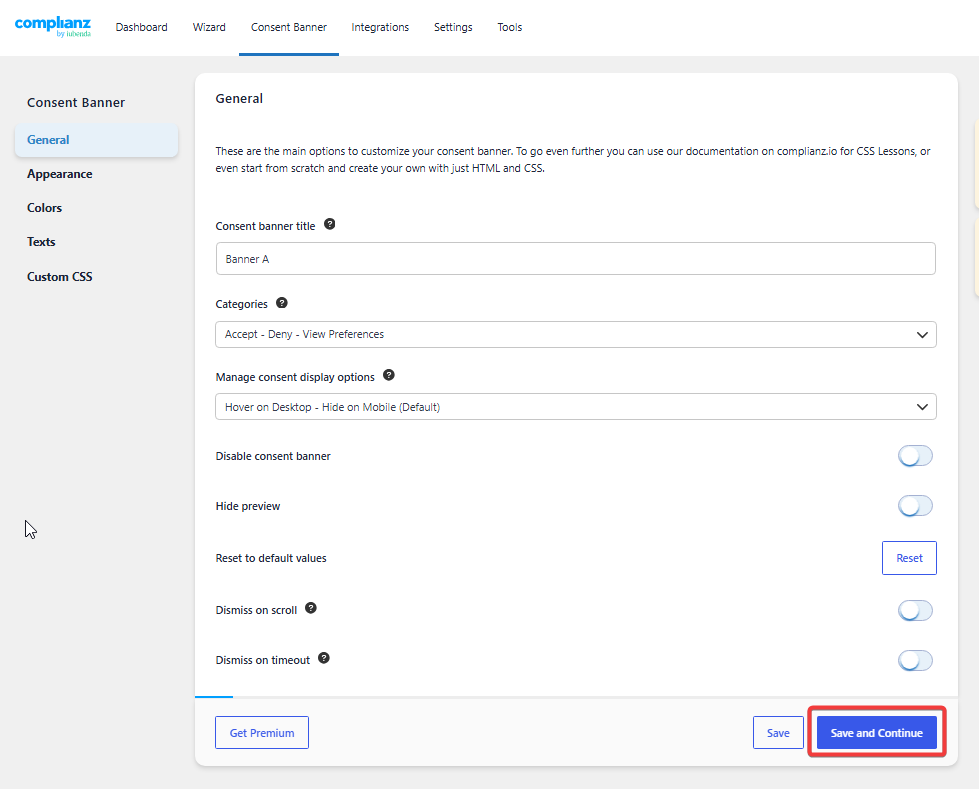
Under the General settings, confirm that the banner follows common cookie banner requirements and includes clear options for:
- Accepting cookies
- Denying non-essential cookies
- Viewing and changing preferences
You can also customize the banner’s appearance, colors, text, and other display settings.
Avoid enabling options that dismiss the banner automatically when a visitor scrolls or waits. Consent should be based on a clear action by the visitor.
Step 19 – Understand Remaining Complianz Dashboard Warnings
After completing the wizard, the Complianz dashboard may still show open tasks or Premium recommendations.
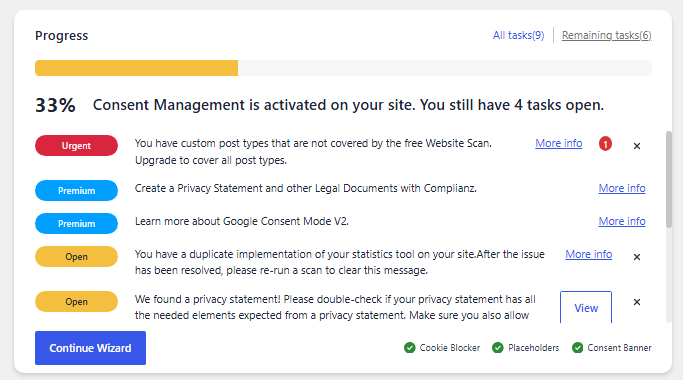
This does not always mean that the basic setup has failed. In the free version, you may still see notices about:
- Custom post types that were not included in the free scan
- Premium legal documents
- Google Consent Mode v2
- Duplicate statistics or tracking implementations
- An existing Privacy Policy that should be reviewed
Focus on genuine configuration problems. Premium feature recommendations can remain visible even when the free cookie banner is active.
If Complianz reports a duplicate statistics implementation, check whether Google Analytics or Google Tag Manager is being added by more than one plugin, your theme, or custom code. Keep only one installation method.
Step 20 – Test the Complianz Cookie Banner
Open your website in a private or incognito browser window while logged out of WordPress.
The Complianz consent banner should appear when the page loads.
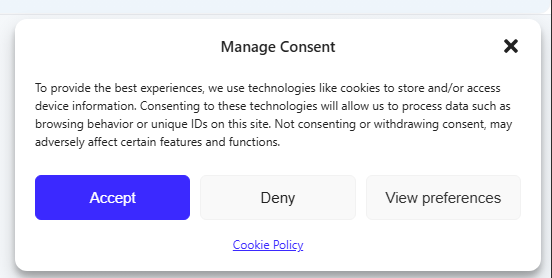
Check that:
- The cookie banner appears for a new visitor
- The Accept button works
- The Deny button works
- The View preferences button opens the preference settings
- The Cookie Policy link opens the correct page
- The banner does not immediately reappear after saving a choice
You should also check whether non-essential analytics and marketing cookies are blocked before consent.
Test the banner while logged out and in a private browser window. Your normal browser may already contain a saved consent choice or WordPress administrator cookies.
How to Check Whether Cookies Are Blocked Before Consent
Displaying a banner is only one part of the setup. You should also check that analytics and marketing cookies do not load before the visitor gives consent.
A simple test is:
- Open the website in an incognito window.
- Do not click Accept.
- Open the browser’s developer tools.
- Check the Application or Storage section for cookies.
- Accept cookies and compare the results again.
Non-essential cookies should normally appear only after the relevant consent has been given.
You can also use our Cookie Scanner as an additional check, but automated scans should not replace manual testing.
Common Complianz Setup Problems
The Cookie Banner Does Not Appear
Make sure you clicked Finish in the setup wizard and enabled Show Consent Banner.
Then clear your website cache and test again in an incognito window. The banner may also stay hidden if your browser already contains a saved consent choice.
Google Analytics Loads Before Consent
Check how Google Analytics or Google Tag Manager is installed. It may be loaded by your theme, another plugin, Google Site Kit, or custom code.
Make sure the same tracking script is not installed in several places.
Complianz Reports a Duplicate Statistics Tool
This usually means that the same analytics or tag management script has been detected more than once.
Choose one installation method and remove or disable the duplicate implementation.
The Free Scan Does Not Cover Every Page
The free Website Scan may have limited coverage and may not include custom post types. Test important templates and website areas manually.
Complianz Premium provides additional scanning and automation features, but you do not need Premium simply to complete the basic free setup.
The Cookie Policy Is Missing From the Website
Check that the Cookie Policy page was created and published. Add it to your footer or another visible website menu if it was not added during the wizard.
Is the Free Version of Complianz Enough?
The free version can be enough for a small WordPress website that needs a basic cookie banner, cookie scanning, script blocking, and a generated Cookie Policy for one primary region.
You may need Complianz Premium if your website requires features such as:
- Consent management for multiple regions
- Google Consent Mode v2 through Complianz
- Records of Consent
- Additional legal documents
- More advanced website scanning
- Coverage for more complex website configurations
Read our Complianz Pricing guide to compare the free and paid options.
Want to understand the tool’s strengths, limitations, and ideal use cases?
Final Thoughts
Installing Complianz on WordPress is straightforward, but the answers in the setup wizard must match the services and tracking tools used by your website.
After completing the wizard, do not stop at the Finish button. Test the banner in an incognito window, check the Accept and Deny options, open the Cookie Policy, and confirm that non-essential cookies are blocked before consent.
Next Step: Review Your Cookie Consent Setup
Your Complianz cookie banner should now be active. The next step is to test your website carefully and fix any services or scripts that still load before consent.
Not sure whether Complianz is the right long-term option? Compare it with other solutions in our How to Choose the Right Cookie Consent Tool.

Frequently Asked Questions
Common questions about this topic
Yes. Complianz offers a free WordPress plugin that includes a cookie banner, a setup wizard, cookie scanning, basic script blocking, and a generated Cookie Policy. More advanced features require Complianz Premium.
You can install and start configuring the plugin directly from WordPress. However, the newer Website Scan may ask you to provide and confirm an email address so Complianz can authenticate your website.
Complianz can block recognized cookies, scripts, and third-party services when the cookie and script blocker is enabled and correctly configured. You should always test the result on your own website.
Yes. Complianz can work with Google Tag Manager. Select the GTM option in the Statistics section and make sure the container is not added twice by different plugins or code snippets.
Some dashboard notices are Premium recommendations or limitations of the free scan. Other warnings, such as duplicate analytics implementations, should be checked and corrected.
Yes. Complianz can display a Manage Consent option that allows visitors to reopen the consent settings and update their choices.