A visible cookie banner does not prove that tracking follows the visitor’s choice. This guide walks you through practical checks in Chrome DevTools, including rejection, acceptance and changing consent.
The screenshots use CookieHub, but the same approach works with most consent platforms. The main walkthrough tests an opt-in setup, where optional cookies that require consent stay disabled until the visitor agrees.
For an opt-in setup, check that optional cookies and services follow the visitor’s choice:
- Close all Chrome Incognito windows, then open the website in a new one.
- Confirm that the cookie banner appears.
- Check that optional categories are disabled before consent.
- Select Deny all and verify that optional cookies are not created.
- Repeat the test with Allow all.
- Confirm that installed services can use the cookies you approved.
- Test a custom selection and then withdraw consent.
- If Google Consent Mode is enabled, check the consent signals sent with Google Analytics requests.
What You Need Before Testing
This guide tests an opt-in setup: optional cookies that require consent stay disabled until the visitor agrees. If your banner uses regional rules, test from a location where that setup applies, or use your provider’s regional testing tools. A banner may correctly behave differently in another region.
Before you begin, make sure you have:
- a published cookie banner;
- access to your live website;
- Google Chrome;
- a private or incognito browser window;
- permission to test the website’s analytics and tracking setup.
The steps and screenshots in this guide use Google Chrome. Other browsers provide similar tools, but the names and locations of the panels may be different.
If your website uses caching or optimization, clear the website cache before beginning. Otherwise, an older version of the banner or consent configuration may still be displayed.
Start With a Clean Browser Session
Cookie banners normally remember the choice previously made in the browser. If you have already accepted or rejected cookies, the banner may not appear when you visit the website again.
To begin a clean test, close all existing Chrome Incognito windows before opening a new one.
How to open an Incognito window in Google Chrome
- Open Google Chrome.
- Click the three-dot menu in the top-right corner.
- Select New Incognito window.
- Enter your website address in the new window.
- Confirm that the cookie banner appears for the opt-in region you are testing.
You can also open an Incognito window using the keyboard shortcut:
- Windows: Ctrl + Shift + N
- Mac: Command + Shift + N
Do not log in to your website or content management system while performing the test. Some websites hide tracking or display different content to logged-in administrators.
Keep the Incognito window open throughout one test. When you want to test another consent choice, close all Incognito windows and open a new one.
Finish the Deny all test, close all Incognito windows, and then open a new one for Allow all. For withdrawal, change the choice in the same session instead.
Chrome blocks third-party cookies by default in Incognito. A missing cookie may therefore be blocked by the browser rather than your banner. If a service stays blocked even after Allow all, check browser restrictions and extensions before deciding the consent setup failed. For a controlled test, Chrome lets you temporarily allow third-party cookies for that site; repeat both consent choices under the same browser settings. See Chrome’s Incognito guidance.
Check That the Cookie Banner Appears
Open your website in a private browser window and confirm that the cookie banner appears before you interact with the page.
The banner should provide clear ways to:
- accept optional cookies;
- reject optional cookies;
- open detailed cookie settings.
The exact button labels depend on the consent platform and the wording configured by the website owner.
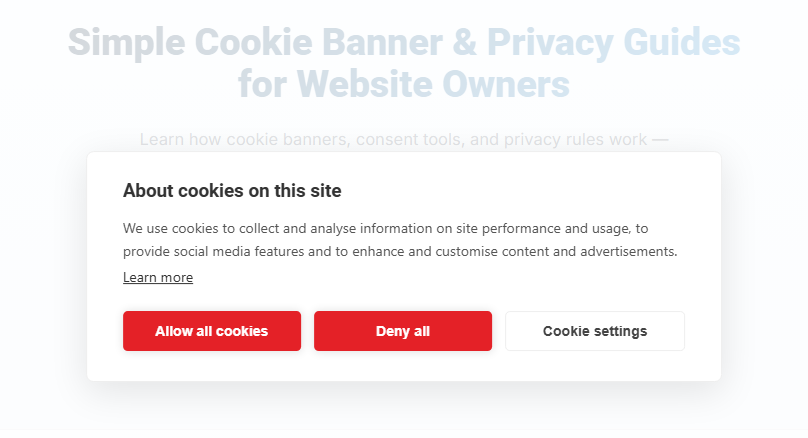
If the banner does not appear, check the domain, publication status and regional rules. If you recently changed the configuration, clear the website cache and start another clean session.
Review the Cookie Settings Before Consent
Open Cookie settings before accepting or rejecting anything.
Necessary cookies may remain enabled because they support essential website functions. Optional categories such as Analytics and Marketing should not be preselected when the website uses an explicit opt-in configuration.
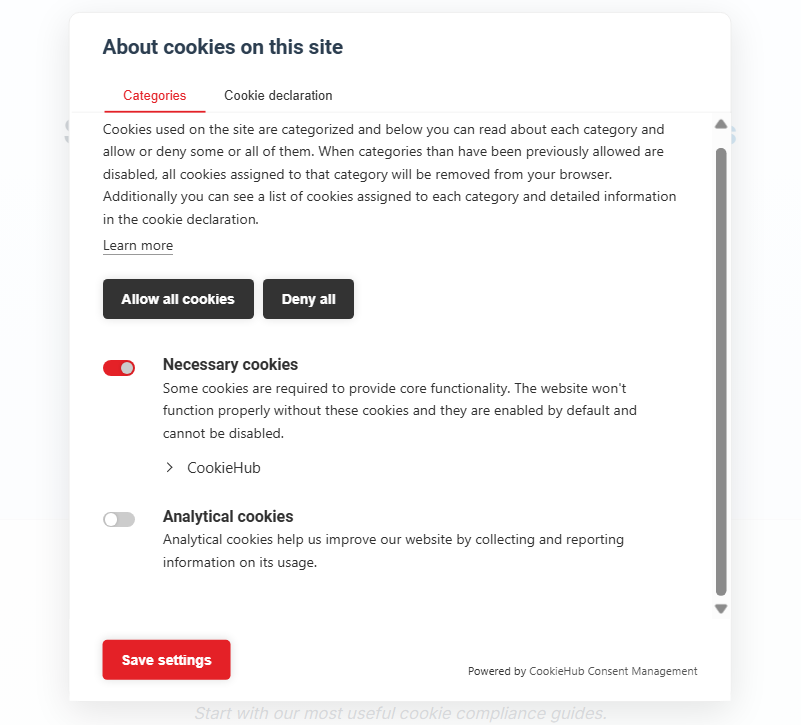
Check that:
- necessary and optional categories are clearly separated;
- optional categories are not selected by default;
- category descriptions are understandable;
- the visitor can save a customized choice;
- the cookie declaration can be opened when available.
Check Cookies Before Making a Choice
Next, check which cookies are stored before the visitor makes a consent choice. Opening the settings panel is not consent; do not save or accept a choice yet.
If you need a broader introduction to inspecting browser cookies, see our guide on how to find cookies on a website.
- Right-click the page and select Inspect.
- Open the Application tab.
- Expand Cookies under Storage.
- Select your website domain.
- Review any other domains listed under Cookies.
- Check the cookie names, domains, paths, and expiration dates shown in the table.
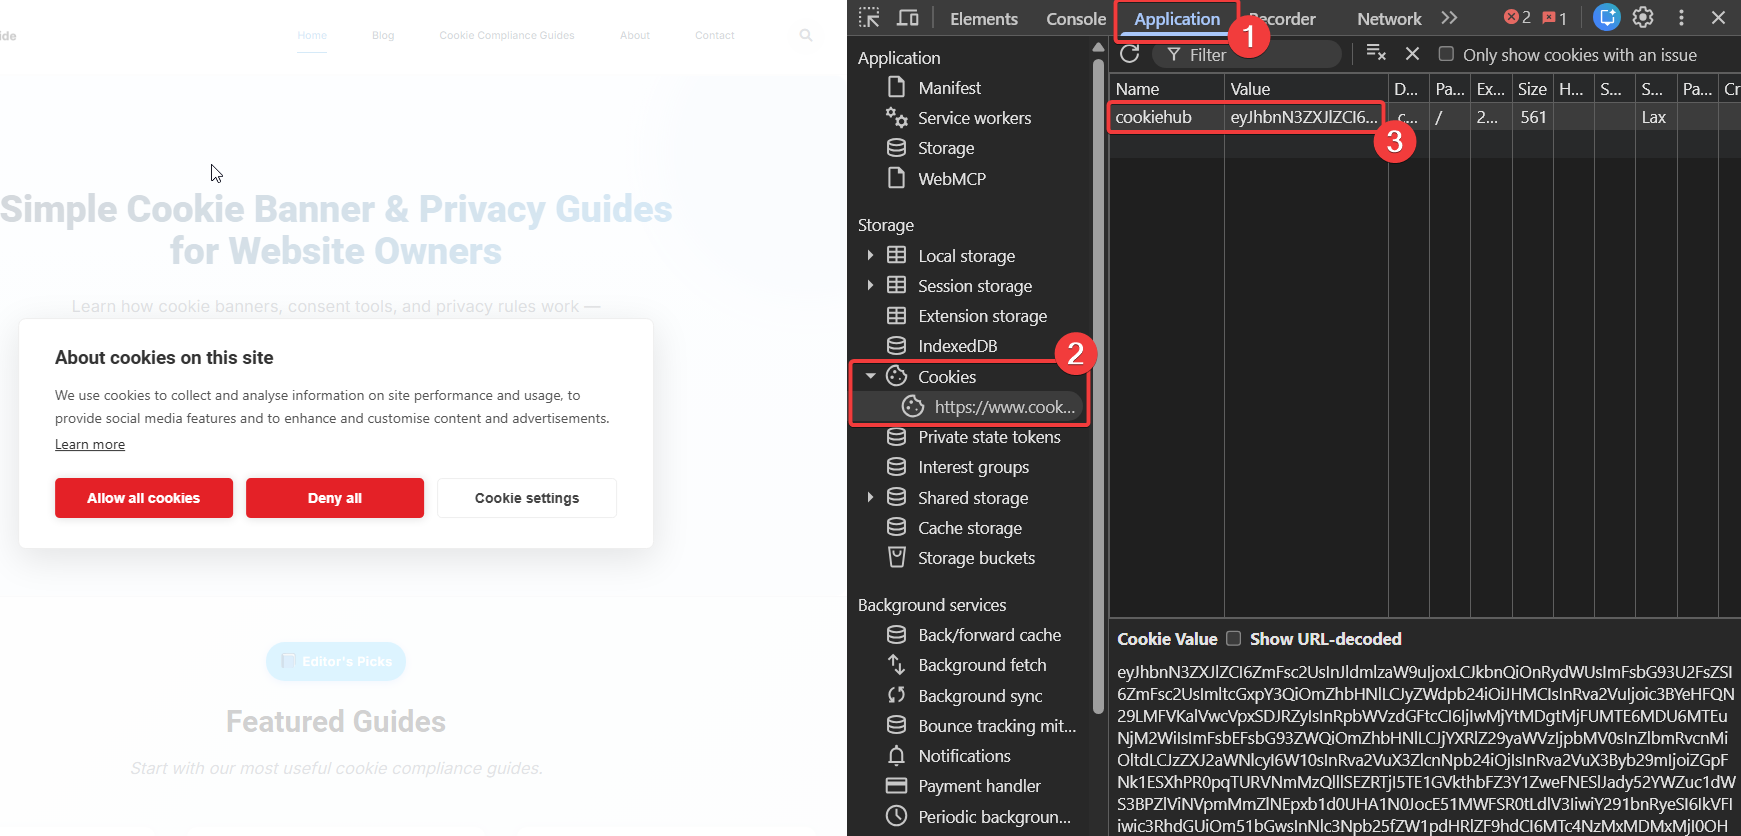
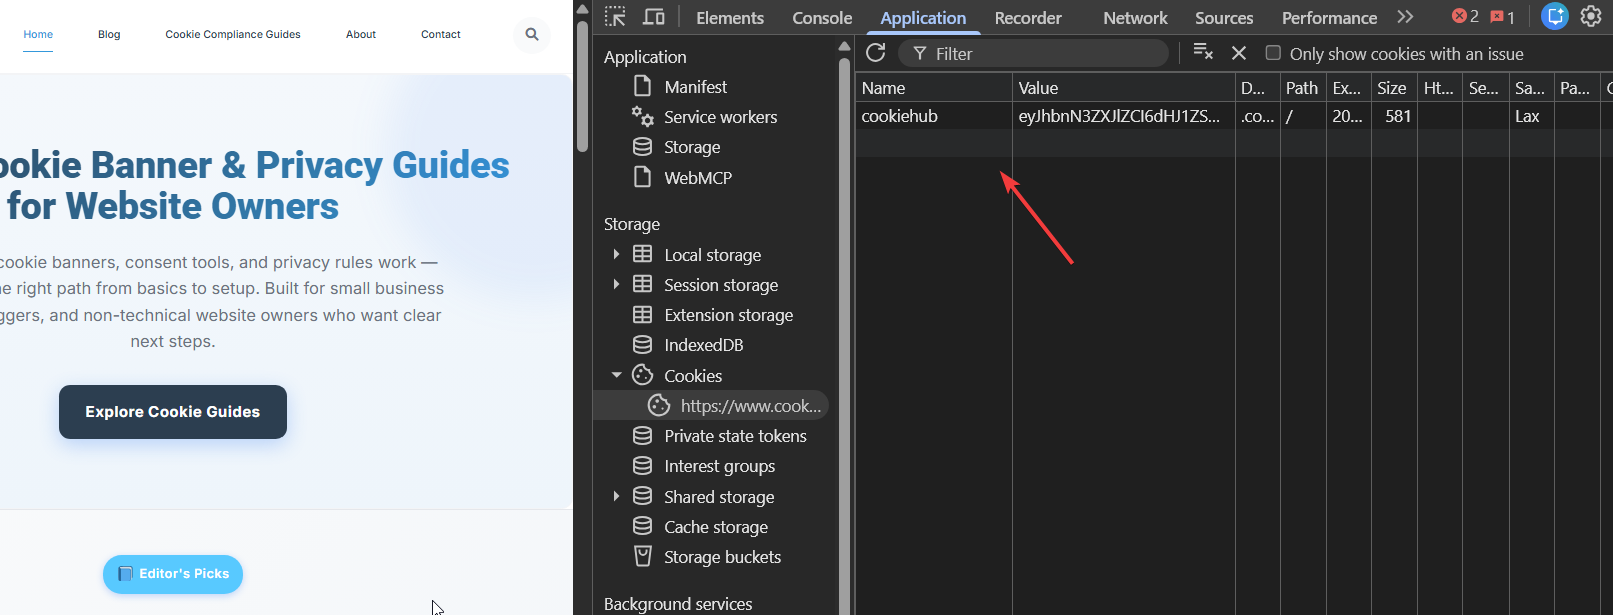
In this example, CookieHub creates the cookiehub cookie as part of the banner’s necessary consent-management function.
Optional analytics cookies such as _ga should not be created before the required analytics consent has been given.
Test the Deny All Option
Begin by testing the rejection option. Select Deny all or the equivalent button provided by your cookie banner.
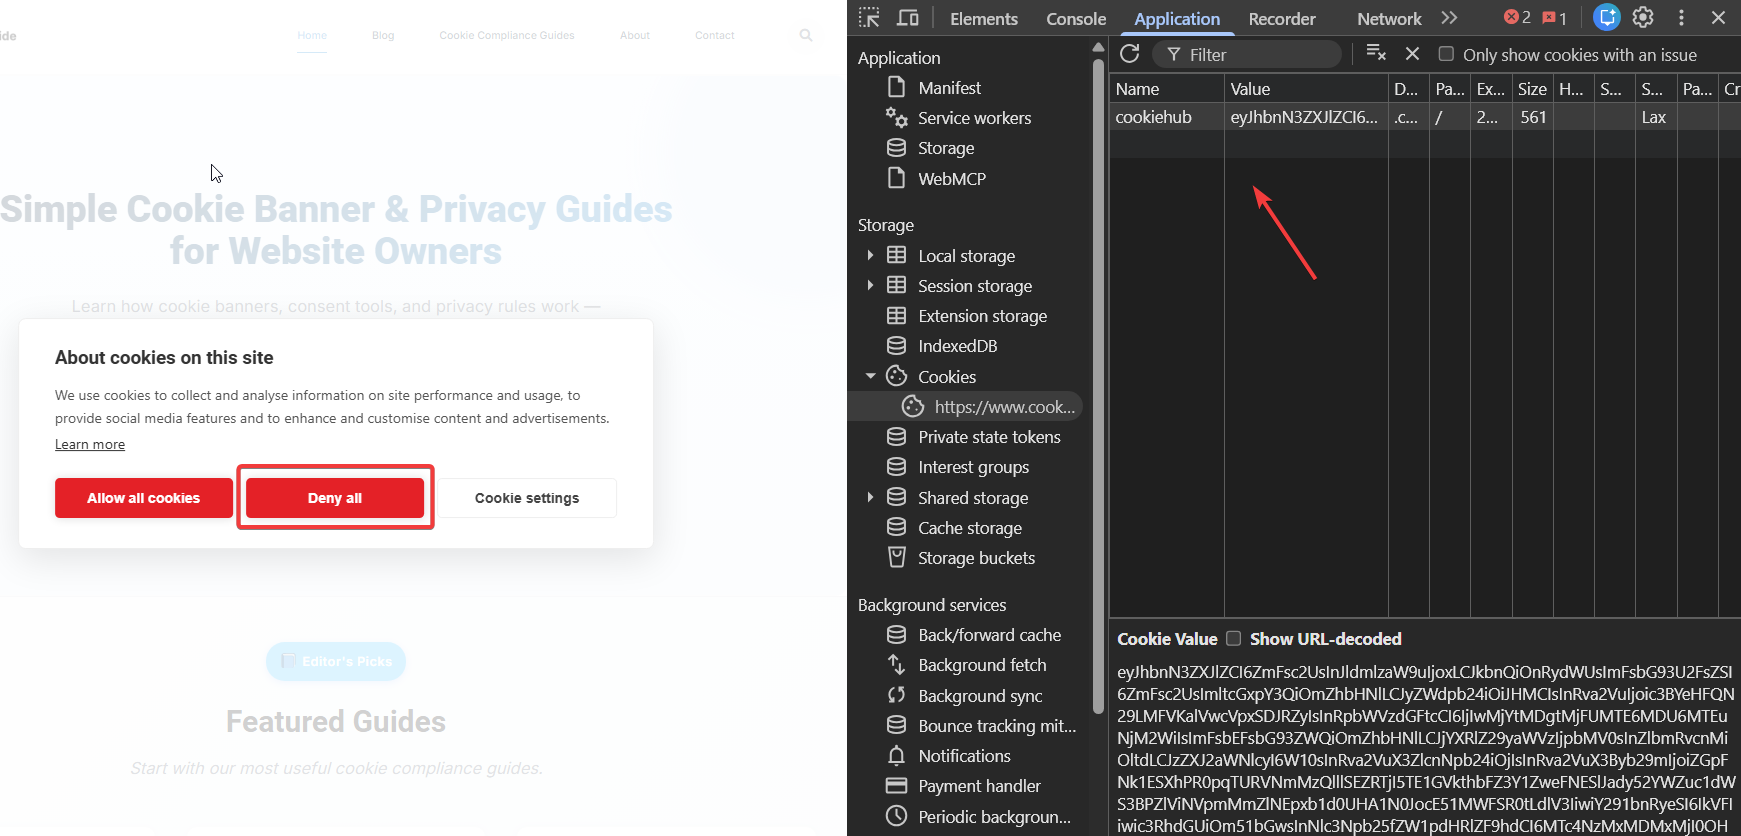
After the banner closes, return to Application → Cookies and review the stored cookies again.
The consent platform’s necessary cookie may remain because it records the visitor’s rejection. However, optional analytics and advertising cookies should not be created.
In this example:
- the CookieHub consent cookie remains;
- no
_gacookie is visible; - no property-specific
_ga_...cookie is visible.
In this check, no Google Analytics cookies were visible after rejection. That is an expected result, but it does not prove that all tracking is blocked. Check network activity and other installed services too.
Test the Allow All Option
Now repeat the test with consent granted.
Close all Incognito windows used for the Deny all test. Then open a completely new Incognito window so that the earlier consent choice cannot affect the result. Open Chrome DevTools before making a new choice.
Select Allow all cookies.
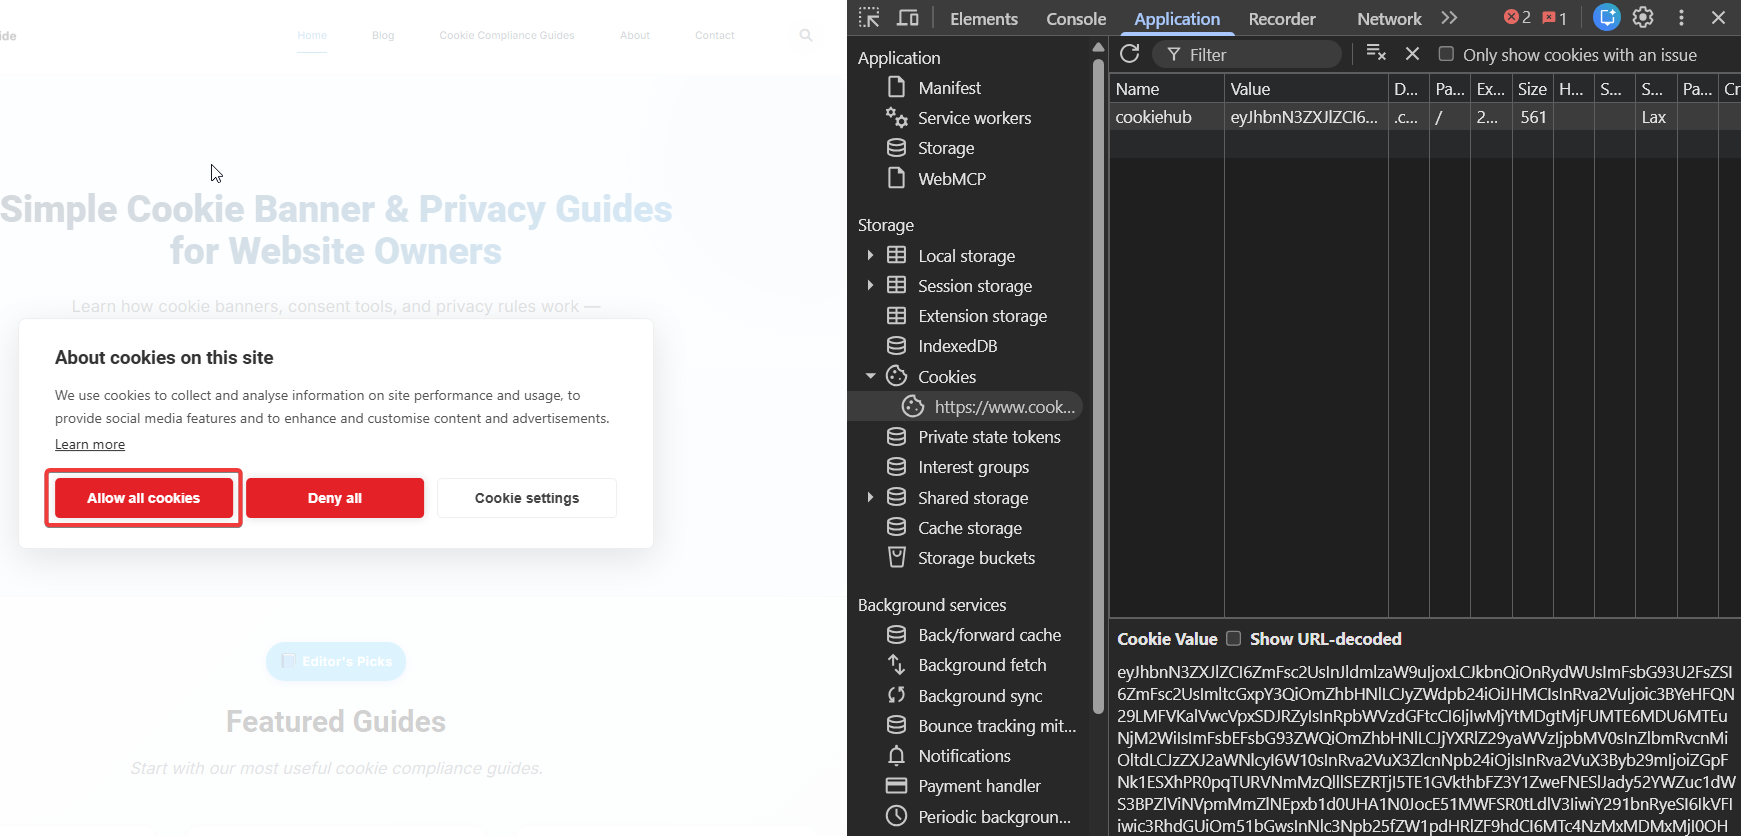
Return to Application → Cookies and review the stored cookies.
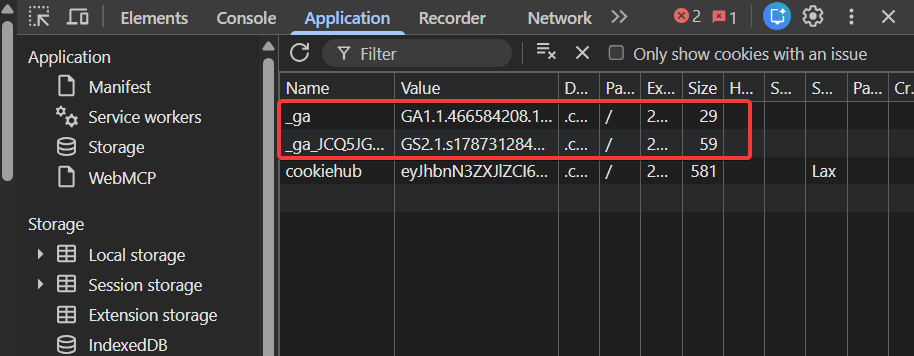
When Google Analytics is configured correctly, cookies such as the following may appear:
_ga;- a property-specific cookie beginning with
_ga_.
The exact cookies depend on the services installed on the website. Not every analytics or advertising service uses the same cookie names.
After selecting Allow all, wait a few seconds before checking the Cookies panel. You can use the refresh button inside the Application panel to update its displayed cookie list.
Check Google Analytics and Consent Mode
If your website uses Google Analytics, continue with this check. Otherwise, test the network requests and consent integration of the services you actually use. A site without Google Analytics is not expected to create _ga cookies.
The Cookies panel shows whether browser cookies were created, but it does not show the complete Google Consent Mode behaviour.
Start a new clean Incognito session for the before-consent check. Do not reuse the session where you selected Allow all.
To inspect Google Analytics requests:
- Open the Network tab in Chrome DevTools.
- Make sure network recording is enabled.
- Reload the page with DevTools open, without making a consent choice.
- Enter
collectin the filter field. - Select a new Google Analytics request. Check its destination; other services may also use collect in a request name.
- Open its Payload section.
- Look for the
gcsparameter.
The gcs parameter helps show the storage consent state included with the request. With Basic Consent Mode, no Google Analytics request is expected before consent or after rejection; that absence can be correct.
Check the Request Before Analytics Consent
A Google Analytics collect request appearing before consent does not automatically mean that the cookie banner has failed.
When Advanced Consent Mode is used, Google tags may send limited cookieless requests while analytics and advertising storage remain denied.
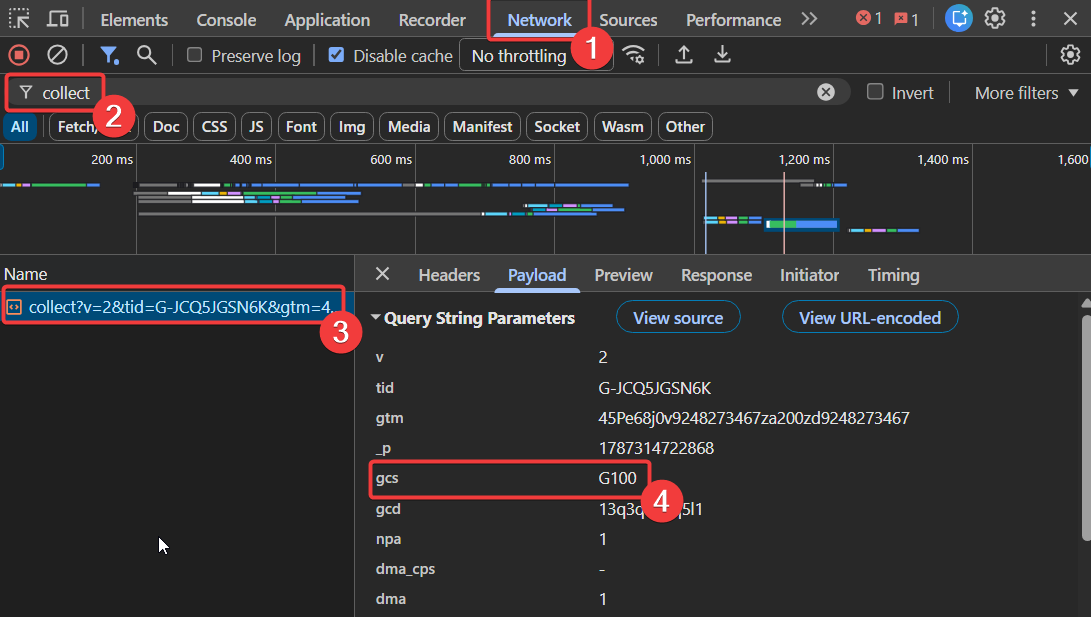
In this test, G100 indicates that analytics and advertising storage have not been granted. A limited request may still be sent, but Google Analytics cookies should not be stored in the browser.
This is why you should check the Network request and the Cookies panel together.
Check the Request After Analytics Consent
Keep Network recording. Clear its request list immediately before selecting Allow all cookies, then wait for a new request and inspect it. This avoids reading an older request from before the consent update.
Check the immediate response first. If nothing happens, navigate or reload to investigate, but record that the consent change did not take effect immediately.
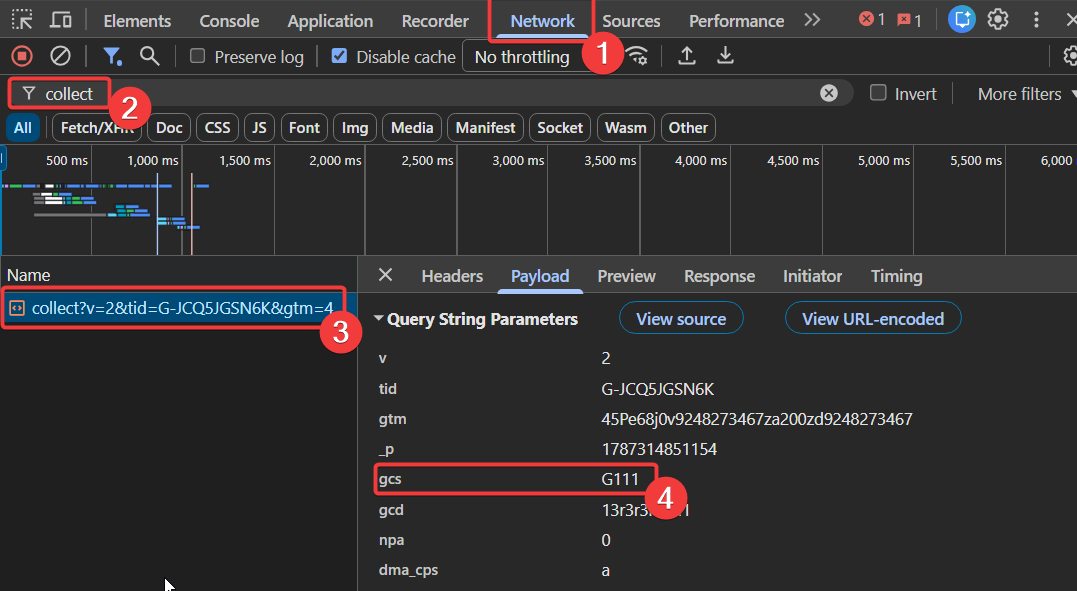
In this test, G111 indicates that analytics and advertising storage have been granted. Google Analytics can now use the allowed storage and create its cookies.
| Value | Meaning in this test | Expected result |
|---|---|---|
G100 |
Analytics and advertising storage are denied | A limited cookieless request may be sent, but _ga cookies should not be created |
G111 |
Analytics and advertising storage are granted | Google Analytics may use cookies and normal cookie-based measurement |
Do not judge the consent setup only by whether a Google Analytics request exists. Check the consent parameters carried by the request and whether analytics cookies were created.
The gcs value reflects the ad_storage and analytics_storage states. It does not by itself confirm the ad_user_data or ad_personalization states. For a complete Consent Mode v2 check, use Google Tag Assistant and review the Consent tab before and after the visitor makes a choice.
You can learn more about this behaviour in Google’s Consent Mode documentation.
Test a Customized Consent Choice
If your site has both Analytics and Marketing categories, start a clean session, open settings, enable Analytics and leave Marketing disabled. Save the choice.
Check that analytics follows the allowed setting while marketing remains restricted. Then reload the page and reopen settings to confirm the selection was remembered. If you use different categories, test an equivalent combination.
Test Whether Visitors Can Change Their Choice
Visitors should be able to change or withdraw their consent after making an earlier choice.
In the same session where you allowed Analytics, use the cookie settings icon or preferences link to reopen the preference center. Turn Analytics off and save. Do not clear site data during this test: you are checking whether withdrawal works for a returning visitor.
Confirm that:
- the preference center opens correctly;
- the earlier choice is displayed;
- the visitor can change the selected categories;
- the new preference is saved;
- future optional tracking follows the latest choice.
An old cookie still appearing in storage does not, by itself, show whether it is being used. Check new requests and consent states after withdrawal, as well as the provider’s cookie-removal behavior. Tracking must stop using the permission that was withdrawn. Advanced Consent Mode may still send measurements without cookies.
Common Cookie Banner Problems
| Problem | What to check |
|---|---|
| The banner does not appear | Check the publication status, domain and regional rules. Start a clean Incognito session. Clear the website cache if you recently changed the setup. |
| Analytics cookies appear before consent | Check whether Analytics is installed more than once or whether its script bypasses the consent platform. |
| Allow all only works after refreshing | Review the consent integration, consent update handling, script-delay settings, and caching configuration. |
| A Google Analytics request appears before consent | This may be normal with Advanced Consent Mode. Check its consent parameters and confirm that analytics cookies were not created. |
| No analytics cookies appear after Allow all | Confirm that Google Analytics is installed and that the consent platform sends a consent update when the visitor selects Allow all. If you use Basic Consent Mode or manual script blocking, also confirm that the Google tag is connected to the correct analytics category. Check the browser console for errors. |
| Different consent choices conflict | Make sure only one consent platform and one installation method are active on the website. |
Do Not Use Multiple Consent Implementations
Do not run multiple cookie banner plugins or installation methods at the same time.
For example, avoid installing the same consent solution through:
- a WordPress plugin;
- Google Tag Manager;
- a manually inserted script;
- another cookie banner plugin.
Using Google Tag Manager to load analytics is not automatically a duplicate implementation. The problem occurs when the cookie banner or consent platform script itself is loaded more than once.
Duplicate implementations can send conflicting consent states, display more than one banner, or block the same tracking script more than once.
Final Cookie Banner Testing Checklist
Before considering the setup complete, confirm that:
- the banner appears for a new visitor where your opt-in rules apply;
- necessary and optional categories are clearly separated;
- optional categories are not selected before opt-in;
- Deny all prevents optional cookies from being created;
- Allow all permits approved cookies and services;
- Cookie settings opens correctly;
- visitors can change their earlier choice;
- Google Analytics receives the appropriate consent state, if you use it;
- a custom category selection is applied and remembered;
- the banner works after clearing the cache;
- the consent update works without requiring another page visit;
- the banner remains usable on desktop and mobile.
The tested pages and services pass these checks when consent-dependent cookies remain disabled before opt-in and after rejection, approved services work after consent, and custom choices and withdrawal are respected. Repeat the checks on pages with different services; one successful page does not cover the entire website.
If consent-dependent cookies are created before permission or after rejection, fix that behavior and repeat the test. If a service never loads even after Allow all, the result is inconclusive: first check that it is installed, triggered and not blocked by the browser. An empty Cookies panel alone is not a pass.
Final Thoughts
A visible cookie banner is only the first part of a working consent setup. The important test is whether the website’s cookies, analytics, advertising tools, and other optional services actually follow the visitor’s choice.
Test the website before making a choice, after rejecting optional cookies, and after allowing them. When Google Consent Mode is enabled, review both the cookies stored in the browser and the consent signals included with Google Analytics requests.
Repeat these checks whenever you add a new analytics tool, advertising pixel, plugin, embedded service, or other technology that may create cookies or access browser storage.
Recommended Next Step
If everything works correctly, review your cookie policy and make sure it accurately describes the cookies and tracking services used on your website. Continue with the guides below to keep your consent setup accurate over time.

Frequently Asked Questions
Common questions about this topic
For an opt-in setup, start a clean browser session and inspect cookies and network requests before consent. Repeat with Deny all, Allow all and a custom category selection. Then withdraw consent in the same session and check that tracking follows the updated choice. Test the services your website actually uses.
With Basic Consent Mode, Google Analytics tags generally wait for consent. With Advanced Consent Mode, Google tags may send limited cookieless requests before consent, but analytics cookies should not be created while analytics storage is denied.
Advanced Consent Mode can send a limited cookieless request while analytics and advertising storage remain denied. Check the request’s consent parameters and confirm that Google Analytics cookies have not been created.
In this test, gcs=G100 indicates that analytics and advertising storage are denied. A limited Google Analytics request may still be sent, but _ga cookies should not be stored in the browser.
In this test, gcs=G111 indicates that analytics and advertising storage have been granted. Google Analytics may then create cookies and use normal cookie-based measurement.
In Chrome, close all Incognito windows and open a new one to start a clean session. The banner should appear if its regional rules apply to your location. To change an existing choice, use the website’s cookie settings icon or preferences link instead.
No. You also need to inspect cookies and network requests. Chrome blocks third-party cookies by default in Incognito, so a missing cookie may be blocked by the browser rather than the banner. Compare consent choices under the same browser settings and investigate services that remain blocked after Allow all.